I have been intending to post this tutorial since before Thanksgiving and have just not had the chance to get it all put together. One of my friends said that she was going to try to learn to sew, so I told her that I would post a tutorial on how to make a simple little girl's skirt. Easy enough for even the novice sewer.
First a few general sewing tips for garment sewing.
First of all, I cannot stress enough with garment sewing how important it is to pre-wash your fabric. This is especially true if your fabric is all cotton or contains cotton. There are a few reasons for this. First of all, cotton shrinks. You want the fabric to be pre-shrunk before you make your garment so that it will fit correctly after it is washed and it will also hold it's shape much better and be less likely to have weird puckers and such after it is washed. Also, washing will tell you if the colors are going to stay true and it will wash out any extra dye or sizing that might be on the fabric, too. I wash mine on either warm or hot but on the gentle cycle. Dry it in the dryer, too. If you have problems with the edges fraying, you can try using pinking shears to trim the raw edge before you wash it. One thing I have noticed that also helps with frayed edges during washing and drying is to trim the worst of them off after washing and straighten the fabric out a bit before throwing it in the dryer. Use scissors to do this, don't just yank the threads and try to rip them, you could wind up ripping the fabric where you don't mean to. You will need to iron the fabric when it comes out as well, if you allow it to dry all twisted up like it comes out of the washer, it will be doubly hard to iron. Ironing is also a little easier if you iron it before it is completely dry. The iron will finish the drying process. The prep is a little bit of work, but it is very worth it.
Secondly a word about fabric grain. If you look at a piece of woven fabric, you can see where the threads cross at a 90 degree angle. This is called the grain of the fabric. There is a crosswise grain which runs from selvage to selvage and there is a lengthwise grain that runs the length of the fabric bolt from cut end to cut end. It is important to try and cut your pieces lined up with the grain of the fabric as best as you can. On commercial patterns there is usually a double ended arrow printed on it. This should be lined up with either grain of the fabric. Usually lengthwise, but sometimes crosswise works. The pattern will usually tell you. If you see something in a pattern that calls for it to be cut on the "bias" this is cut at a 45 degree angle to the grain. Most of the time these pieces are cut so that they can go around a curve because if a piece is cut on the bias it will stretch and bend more easily. You will not need to cut anything on the bias for this project, but it is important to understand because if you get your piece too crooked and not lined up with the grain of the fabric it could stretch somewhat while you are sewing and it can make it more difficult to get a nice finished end result. An ounce of care while cutting will make the whole project much easier, believe me.
Thirdly, a word about fabric choice. First of all, for a novice sewer, I recommend sticking with a woven fabric. Knit fabrics can be tricky to sew with. After 20+ years of sewing, they still make me cringe, LOL. Secondly I recommend spending a little extra for the nicer quilting cottons. It is tempting to buy the cheaper fabrics, and they will work fine for this project if that is what you have on hand or decide to use. The reason that I suggest the better quilting fabrics is that they tend to have a tighter weave. This lends itself to easier sewing because the piece isn't as flimsy. It also does not tend to shrink as much. It also launders better and requires less ironing of the finished garment. A great plus for any moms out there. For this project you will not be purchasing a large amount of fabric, so the extra cost is worth it in my opinion.
Now on to the fun stuff! :)
Supplies needed:
Sewing machine and thread.
3/8 inch or 1/2 inch (depending on skirt size) non-roll elastic enough for waist measurement.
1/2 to 1 3/4 yard fabric depending on the size skirt yo want to make. (Size 6 month-4t are cut on the crosswise grain. 1/2 yard for sizes 6m-12 m, 3/4 yard for sizes 18m-2t, 1 yard for sizes 3t-4t. Sizes 5 and up need to be cut on the lengthwise grain, 1 yard for sizes 5-6, 1 1/2 yards for sizes 7-10, 1 3/4 yards for sizes 12-16. Calculated using my measurements below)
small safety pin
iron and ironing board
small ruler or hem/seam guide
quilting ruler or yardstick
rotary cutter and mat (optional)
First you will need to decide what size you need to make. For this you will need to try and get some basic measurements. All you need is a waist measurement and a waist to knee measurement. (or however long you want the skirt to be knee, mid-calf, whatever)
Here are some typical waist and length measurements in case your little one is too wiggly, but you know the size they typically wear. All measurements are in inches.
6 m waist 18 waist to knee 6
12 m waist 18 waist to knee 8
18 m waist 19 waist to knee 9
2 t waist 20 waist to knee 10.75
3 t waist 20.5 waist to knee 12
4 t waist 21 waist to knee 13.25
5 waist 21.5 waist to knee 14.5
6 waist 22 waist to knee 15.5
7 waist 22.5 waist to knee 18
8 waist 23 waist to knee 19
10 waist 24 waist to knee 20
12 waist 25 waist to knee 21
14 waist 26 waist to knee 22
16 waist 27 waist to knee 23
You will be cutting two rectangles of fabric. They will both be the exact same size. I prefer to use a rotary cutter and a mat, but it is not necessary as long as you measure and cut carefully.
Here is a great tutorial on rotary cutting and t
his video is very good, too. You could also draw yourself a paper pattern using tissue paper or brown packing paper or an old newspaper. Any piece of paper that is big enough for your dimensions to fit will work fine. You will also need a small piece of non-roll elastic the length of your waist measurement minus about an inch. This does not have to be super accurate, as long as the elastic will stretch as large as the waist you need without either being too tight to be comfortable or so loose that it is sagging. A little shorter than the waist measurement is always better than longer. The width of the elastic will be somewhat determined by the size skirt you are making. For up to size 5 or 6, I like to use 3/8 inch. For sizes larger than that I usually use 1/2 inch.
The first thing that you will do is take your waist measurement and add 1 inch. This will be the length of the rectangle you will cut.
I'll use a size 3 for my example. The waist measurement is 20.5. I add 1 inch so the length of my rectangle will be 21.5.
Next take your waist to knee measurement and add 1 inch for your hem, and add the width of your elastic twice plus another half inch. So if your waist to knee measurement is 12 inches, and you are using 3/8 inch elastic, then the equation will look like this.
12 (waist to knee length) + 1 (hem) + .75 (2 times elastic width) + .5= 14.25
Make sense?
The dimensions of your rectangles will be the first measurement x the second measurement.
In my example, it winds up being 21.5x14.25

On your sewing machine, with right sides of the fabric together sew the rectangles together along the short ends using a 1/2 inch seam allowance. These will be the side seams of your skirt. I use a serger for these seams, but you can sew them on a regular machine as well. If you wish to finish the edges you can either trim them with pinking shears or you can zig zag over the edge of the fabric as well. Press these seams to one side if you have finished the edge of the seams. Press them open if you did not finish the edge of the seams.

You should now have a "tube" of fabric.

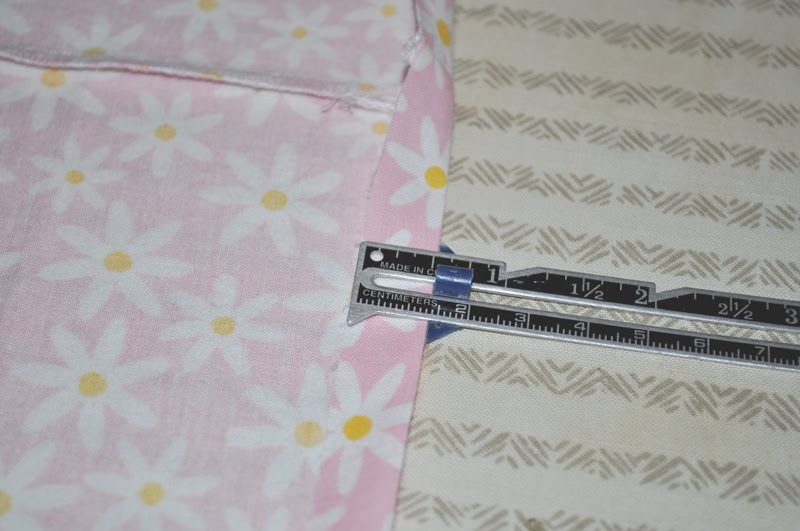
Next we will make your hem. Press up one half inch along one edge of the tube.

Then press up another half inch along that same edge. If you need to pin this, go ahead. Place your pins perpendicular to the fold. Try not to use too many pins as pinning can sometimes distort the shape and actually make it harder to sew. Instead try and get a good sharp crease from your iron. Use steam or spray starch if needed.

Stitch this on your machine staying close to the fold as shown. You can either backstitch this line of stitching a few stitches at the beginning and end, or just overlap a few stitches from the beginning when you get to the end.
Method 1:
A trick that I use is to use my narrow edge foot and set my needle position just to the right a few clicks. I usually do about 4 clicks. I let the edge of the fabric ride along the fin of my narrow edge foot.
Method 2:
If you don't have a narrow edge foot, just set your needle position to the right a little and keep the fold going through the center of the foot.
Method 3:
You can also leave the needle position at center and use a 3/8 inch seam allowance.
Next we will make the casing for the elastic at the top.
Along the remaining raw edge, press under 1/4 inch.
Then press under another 3/4 inch if you are using 1/2 inch elastic or 5/8 inch if you are using 3/8 inch elastic.
Pin this if you need to, and sew in the same manner as the hem only this time you will start just a little to the right of your center back. If you are using the third method of sewing, then you will need to either to a 5/8 inch seam allowance or a ½ inch seam allowance. Find the center back by simply matching up the side seams and making a small crease with your fingers or use tailors chalk or mark b gone pen. A helpful hint I have learned for marking fabric that is dark in color is to use an old bar of soap. You know, when they get too little and slivery to use any more. They have a great fine edge for marking fabric, and the bonus is that it's soap so it will always wash right out.
Begin your sewing just to the right about 1/2 to 3/4 inch to the right of your center back. Remember to backstitch a few stitches at the beginning and end of this line of stitching to lock these stitches down. When you get back around stop stitching about 1/2 to 3/4 inch short of the center back mark. This will leave an opening in the casing about 1 to 1 1/2 inches wide.
Place a safety pin in the end of your elastic as shown.
Feed the safety pin through the casing pulling the elastic through the casing. Make sure the free end of the elastic does not slide all the way up into the casing. A couple of tricks I have for preventing this is to either use another safety pin to pin the elastic in place once it gets close to sliding into the casing, or to put another safety pin in the other end of the elastic so that if it should happen to slide into the casing, you can find it and work it back to to the opening pretty easily. Be careful not to twist the elastic while doing this step.
Once you get the elastic pulled all the way through the casing. Pull both ends so that several inches of elastic are exposed, allowing the fabric to bunch up on the elastic. The more elastic that is exposed, the easier the next step will be. Be careful to keep your elastic from twisting.
Now take a small scrap of your fabric and sew it to the elastic like this.
Next pin the other end of the elastic to it like this. Make sure your elastic is not twisted before you sew it and that the raw ends are flush. Sew it to the fabric scrap as well.
Next zigzag down the middle where the two ends meet. I set my stitch width as wide as it will go and my stitch length to very short.
Trim away any excess fabric. Give this a tug to make sure your stitches are going to hold.
Stretch the elastic and adjust the fabric so that the elastic all goes up into the casing.
Now stitch your casing closed being careful not to catch the elastic in the stitching. You may have to stretch the elastic a little as you sew. Remember to backstitch this line of stitching as well.
Stretch the elastic and adjust the gathers of the fabric so that the gathers are fairly even and the side seams are placed evenly.
You are done! Enjoy your skirt!